The oven’s preheating, and I’m already dreaming about my High Protein Cheesecake. It’s that moment of pure anticipation—creamy filling, a crunchy base, and all that protein goodness.
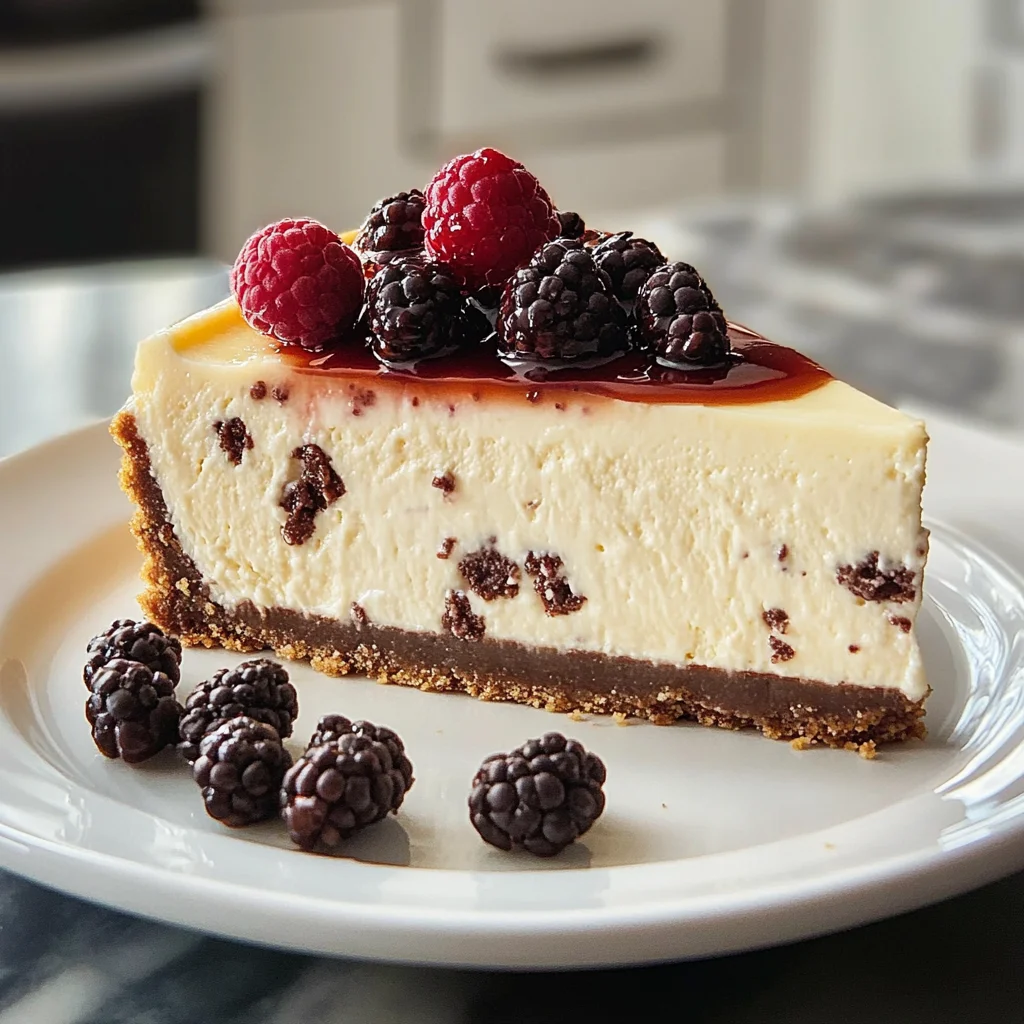
This recipe is for nights when you want dessert but don’t want to feel guilty about it (trust me on this). It swaps out heavy cream cheese for cottage cheese and Greek yogurt, so you get a lighter version without sacrificing flavor. Plus, it bakes in just an hour! You can whip this up even after a long day. Get ready for something amazing!
Why You’ll Love This High Protein Cheesecake
- Super Easy: Mix everything together, bake, and chill. Seriously, it’s basically dump-and-go for busy weeknights.
- Yummy Flavor: It’s got that creamy-sweet goodness with a hint of tang from the lemon juice. So good!
- Creamy Texture: The filling is melty-gooey and super smooth, making every bite feel like a treat (trust me on this).
- Versatile Toppings: You can switch up the toppings — fresh berries are great, but nuts or chocolate drizzle work too.
- Protein Boost: It packs a solid protein punch! Just don’t expect it to taste like a traditional cheesecake; it’s a different vibe.
High Protein Cheesecake Ingredients
For the Base:
almond flour (1 cup) — Use finely ground almond flour or it’ll get gritty in your cheesecake.
coconut oil (2 tablespoons) — Melted coconut oil’s a must for that creamy texture, don’t skip it!
honey (2 tablespoons) — Stick with raw honey for best flavor; don’t swap it for processed stuff.
vanilla extract (1 teaspoon) — Get pure vanilla extract like McCormick, or your cheesecake’ll taste flat.
For the Filling:
cottage cheese (2 cups) — Don’t even think about using low-fat cottage cheese; it’ll ruin the creaminess.
Greek yogurt (1 cup) — Use full-fat Greek yogurt; low-fat just won’t give you the same richness.
eggs (3 large) — Room temp eggs blend better and create a smoother batter, so don’t use cold ones.
stevia or sugar substitute (1/2 cup) — For sweetness, go with a good stevia like Truvia; other substitutes can taste off.
lemon juice (1 tablespoon) — Fresh lemon juice brightens flavors, so skip the bottled stuff or it’ll taste stale.
vanilla extract (1 teaspoon) — Use ripe fresh berries, or you’ll miss that perfect pop of flavor and color.
For the Topping:
fresh berries (1 cup)
Full measurements in the recipe card below.
How to Make High Protein Cheesecake
1. Preheat the Oven: Preheat your oven to 350°F (175°C) while you prep the crust. You’ll want it hot and ready for baking.
2. Make the Base: In a mixing bowl, combine almond flour, coconut oil, honey, and vanilla extract. Mix until crumbly, then press it evenly into the bottom of a 9-inch springform pan.
3. Bake the Crust: Bake the crust in your preheated oven for 10 minutes, then remove and let it cool slightly. It should be just firm enough to hold its shape.
4. Blend the Filling: Now, in a blender, add cottage cheese, Greek yogurt, eggs, stevia, lemon juice, and another scoop of vanilla extract. Blend until it’s smooth and creamy — no lumps!
5. Combine and Pour: Pour the filling over your cooled crust in the springform pan, spreading it out evenly so it bakes nicely.
6. Bake Again: Bake for 50 minutes or until the center is set but still jiggles a bit when you gently shake the pan (trust me on this).
7. Cool Down: Turn off the oven, crack the door open, and let your cheesecake cool inside for about an hour (don’t rush this step or you might end up with cracks!).
8. Finally, refrigerate your High Protein Cheesecake for at least 4 hours — overnight’s even better — before topping with fresh berries right before serving.
Exact quantities in the recipe card below.
How to Store High Protein Cheesecake
- Room Temperature: Don’t leave it out too long. If you need to, cover it loosely with foil and keep it at room temp for up to 2 hours. Otherwise, it’s best in the fridge.
- Refrigerator: Store it in an airtight container or wrap it tightly with plastic wrap. It’ll last about 4-5 days, but the texture gets a bit denser over time (still delicious, though!).
- Freezer: You can freeze slices wrapped individually in plastic wrap and then in foil. They’ll keep for about 2-3 months. Just know that freezing can change the texture a bit when thawed (not as creamy).
- Reheating: For best results, let it sit at room temp for 30 minutes before enjoying again. You can pop it in a preheated oven at 300°F until warmed through, about 10 minutes — you’ll know it’s ready when you catch that lovely smell wafting through the kitchen!
What to Serve with High Protein Cheesecake?
It’s creamy and rich, so adding something with acidity or a crunchy texture helps balance things out nicely.
- Fresh Berries: Their tartness cuts through the sweetness, making each bite feel refreshing. Just toss them on top before serving.
- Whipped Cream: A dollop adds a light, airy texture that contrasts beautifully with the dense cake. Use store-bought or whip some up in 5 minutes!
- Dark Chocolate Shavings: The slight bitterness of dark chocolate enhances the cake’s sweetness while adding a nice visual contrast. Sprinkle some over the top for flair!
- Citrus Zest: Lemon or lime zest brings a bright acidity that lifts this dish and wakes up your palate. Just grate a little on top right before serving.
- Almonds or Pecans: Chopped nuts add a satisfying crunch that contrasts perfectly with the smooth filling. Toast them lightly for extra flavor!
- Mint Leaves: They give a fresh burst of flavor that balances richness and adds color to your plate. Just toss on a few leaves for decoration.
High Protein Cheesecake Variations
Here’s how to play with this recipe and give your High Protein Cheesecake a little twist.
- Chocolate Swirl: Add 1/2 cup cocoa powder to the filling for a chocolatey upgrade. Mix it in before pouring over the crust.
- Berry Blast: Fold in 1 cup of mixed berries into the filling for a fruity burst. Add them just before pouring into the pan.
- Coconut Dream: Substitute half of the Greek yogurt with coconut yogurt for a tropical vibe. Mix it in with the other filling ingredients.
- Nutty Crunch: Top with crushed nuts after baking for an added crunch. Sprinkle them on right before serving.
- Lemon Zing: Increase lemon juice to 2 tablespoons for a sharper citrus flavor. Blend it in with the other filling ingredients.
- Pumpkin Spice: Add 1 cup of canned pumpkin and 1 teaspoon pumpkin spice when blending the filling for an autumn-inspired twist (trust me on this!).
- Vanilla Bean Upgrade: Use 1 tablespoon vanilla bean paste instead of extract for an upscale, aromatic flavor boost in both base and filling.
Make Ahead Options for High Protein Cheesecake
I love that I can prep the High Protein Cheesecake ahead of time! You can make the crust and filling up to two days in advance. Just store the crust in an airtight container at room temperature and keep the filling in the fridge until you’re ready to assemble. Once you’ve poured the filling into the cooled crust, it needs to bake, then cool in the oven for an hour before chilling it overnight. Fresh berries are best added right before serving since they can get mushy if left too long on top. Honestly, while the cheesecake holds well for days, I wouldn’t recommend making it more than two days ahead. Serve it fresh!
High Protein Cheesecake Recipe FAQs
Can I make High Protein Cheesecake ahead of time?
Absolutely! This dish is perfect for making ahead. You can bake it a day or two in advance and keep it in the fridge until you’re ready to serve. Just remember to let it cool completely before refrigerating, and top with fresh berries right before serving for that pop of color and flavor (trust me, it makes a difference!).
What can I substitute for honey in this recipe?
If you need a substitute, maple syrup works well, but stick to a similar amount since it’s liquid. Agave nectar could work too, but I find honey gives a richer flavor that balances nicely with the cheese. Just don’t use processed sweeteners here; they won’t give you the same sticky-sweet goodness.
Why did my High Protein Cheesecake crack on top?
Cracks usually happen when the cheesecake cools too quickly. To avoid this, make sure to crack the oven door when turning off the heat and let it cool slowly inside for an hour. And if your filling’s not blended smoothly enough (no lumps!), that can also contribute to cracks. A smooth texture’s key!
How do I know when this dish is done baking?
You’ll want to bake your cheesecake for about 50 minutes until the center is set but still jiggles slightly when you shake the pan gently (it’ll firm up as it cools). If it’s solid all around, it’s probably overbaked — no one wants dry cheesecake! Always trust your instincts on that jiggle!
Final Thoughts on High Protein Cheesecake
This High Protein Cheesecake is all about that creamy texture, thanks to the cottage cheese and Greek yogurt. You’ll love how it balances rich flavor with a healthy twist. If you’re looking for something that feels like a treat but packs a protein punch, this is it! Seriously, once you make it, it’ll probably become a go-to for those busy weeknights when you need something quick and satisfying. Let me know how yours turned out in the comments!
High Protein Cheesecake
Ingredients
Method
- Preheat the oven to 350°F (175°C).
- In a mixing bowl, combine almond flour, melted coconut oil, honey, and vanilla extract. Mix until crumbly.
- Press the mixture into the bottom of a 9-inch springform pan evenly.
- Bake in the preheated oven for 10 minutes, then remove and let cool.
- In a blender, combine cottage cheese, Greek yogurt, eggs, stevia, lemon juice, and vanilla extract. Blend until smooth.
- Pour the filling over the cooled crust in the springform pan.
- Bake for 50 minutes or until the center is set. It may still jiggle slightly.
- Turn off the oven, crack the door, and let the cheesecake cool in the oven for 1 hour.
- Refrigerate the cheesecake for at least 4 hours, or overnight for best results.
- Before serving, top with fresh berries.